

How to Use the Compare Tool in Microsoft Word
When proofreading your clients’ documents, keeping track of all your changes can be a chore. Thankfully, Microsoft Word has tools that can spare you the trouble. One is the Compare tool, a function used to highlight the differences between two documents. This function can be a lifesaver for proofreaders. In this post, we will walk you through how to use the Compare tool in both Word for Windows and Word for Mac.
What Is the Compare Tool?
The Compare tool in Microsoft Word highlights the differences between two documents as tracked changes. As a proofreader, this can be very handy if:
- You forget to turn on the Track Changes tool when you start editing a document (as you can then generate a version with the edits tracked after the fact).
- You’re working on multiple drafts of a document and your client hasn’t tracked their own revisions (as you can then compare their draft to the last one you worked on).
You can even use Compare in place of the Track Changes tool if you prefer to work without tracking changes as you go. But how do you use this tool? We explain the basics below.
How to Use the Compare Tool in Microsoft Word for Windows
To use the Compare tool in Word for Windows, you’ll need to:
- Go to Review > Compare.
- Click on Compare… to open a new window.
- Select the original version of the document as the Original document.
- Select the proofread or revised version as the Revised document.
- Choose how to display the changes at the bottom of the window under Show changes (we’d recommend using Word level and New document as a default).
- Click OK to see the differences between the selected documents as tracked changes.
You can then review the differences between the documents. If you use the New document option, moreover, you can save this new document under a new name to preserve the edits (e.g. if you are returning it to a client to show the changes you made while editing).

How to Use the Compare Tool in Microsoft Word for Mac
The Compare tool can also be used in Microsoft Word for Mac. To do this:
- In Word 2016 for Mac or later, go to Review > Compare (or, in Word 2011 for Mac, go to Tools > Track Changes > Compare).
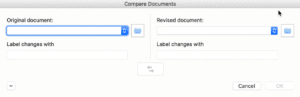
- Click Compare documents… to open a new window.
- Select the original version of the document as the Original document.
- Select the proofread or revised version as the Revised document.
- If required, click the down arrow in this window to select how the differences between the documents will be displayed.
- Click OK to create a new document with the differences tracked.
This will create a new version of the document with the differences displayed as tracked changes. You can then review these changes as required. And, if needed, you can then save the document under a new name to preserve the changes shown (e.g. if you are returning it to a client to show the changes you made while editing).
Become A Proofreader
That’s it for using the Compare tool in Microsoft Word. For more information on using Microsoft Word, take a look at our advice page or sign up for the free trial of our Becoming A Proofreader course for expert training in freelance proofreading.


Your email address will not be published.