

How to Add a Picture to a Word Document
Do you know how to add a picture to a Word document? If not, don’t worry – it’s simpler than you might think! Adding visuals to a document can greatly enhance its visual appeal and effectiveness. Being able to make documents look more professional is a valuable skill, whatever your role. And if you’re a proofreader or editor who wants to offer formatting services, it’s worth knowing how to add images to a Word document so you can confidently assist your clients.
In today’s post, we’ll walk you through some simple steps to seamlessly integrate images into a Microsoft Word document. We’ll provide steps for both Windows and Mac users.
What Are the Benefits of Adding Images to Your Documents?
There are many benefits to adding images to a document. For example, a well-placed, clear image can:
- Make your content more visually appealing
- Highlight key pieces of information
- Help your audience visualize (and better understand) data or statistics
- Break up large chunks of text and aid readability
As they say, a picture is worth a thousand words! Photographs, infographics, diagrams, charts, graphs – they can all enhance your documents.
How to Add Pictures to a Microsoft Word Document
Firstly, let’s look at how to add an image to your document.
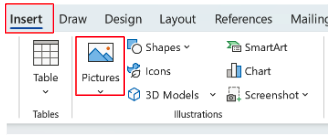
Windows Users: Open your Word document and click on the “Insert” tab in the toolbar. Then, select “Picture” from the drop-down menu. Browse your computer for the desired image and click “Insert.”
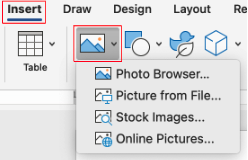
Mac Users: Open your Word document and click on the “Insert” tab in the toolbar. Then, choose “Picture” from the drop-down menu. Navigate to your image file and select “Insert.”
It’s important that any image you use has a proper file extension. The most common file types for images have the file extension .png, .jpeg (or .jpg), or .gif.
Changing the Text Wrapping
Once you’ve added your image to the document, you may want to adjust the text wrapping. Text wrapping determines how your image is positioned in relation to the text in the document. You can use it to ensure your image fits seamlessly into the document layout.
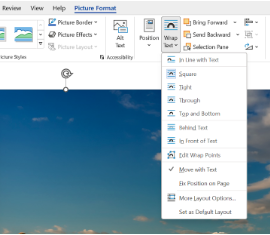
Windows Users: Click on the image, then go to the “Picture Format” tab. Select “Wrap Text.” Choose from options like “In Line with Text,” “Square,” or “Tight,” depending on your preference.
Mac Users: Click on the image, then go to the “Picture Format” tab. Select “Wrap Text.” Choose from options like “In Line with Text,” “Square,” or “Tight,” depending on your preference.
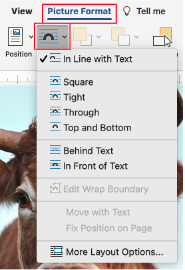
The main text wrapping options are:
- Square – The text wraps around the image but creates a straight-edged boundary, even if the image has an irregular shape.
- Tight – The text wraps tightly around the image, with its boundary following the image’s shape.
- Through – The text flows through the image or object.
- Top and Bottom – The image appears on its own line, with text positioned above and below it.
- Behind Text – The text appears in front of the image.
- In Front of Text – The image appears in front of the text so that the text wraps around it.
Resizing Your Image
If you want to make your image smaller or larger, you have a few options.
Windows Users: Your first option is to simply click and drag one of the small dots that appear at the corners of the image. Hold the Shift key while doing so to maintain the image’s aspect ratio. Alternatively, you can:
- Right-click on the image, select “Size and Position” from the drop-down menu, and adjust the dimensions to your desired height and/or width.
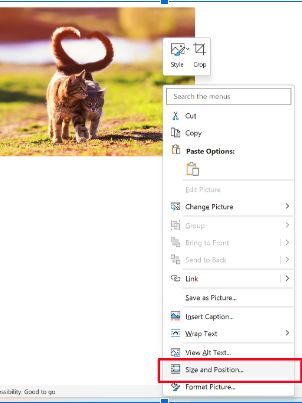
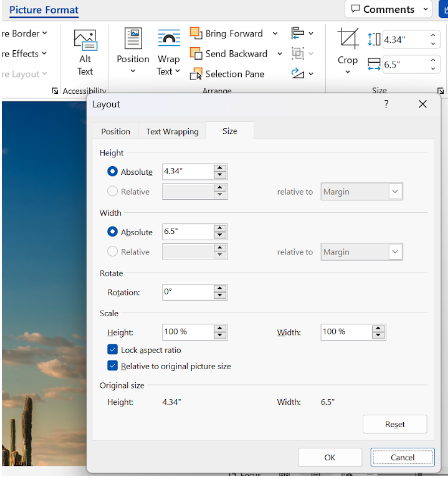
- Click on the image, then go to the “Picture Format” tab. In the “Size” section, click on the “Layout” button and go to the “Size” tab. Set it to your desired height and/or width.
Mac Users: Your first option is to simply click and drag one of the small dots that appear at the corners of the image. Hold the Shift key while doing so to maintain the image’s aspect ratio. Alternatively, you can:
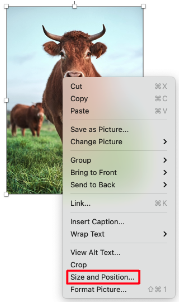
- Right-click on the image, select “Size and Position” from the drop-down menu, and adjust the dimensions to your desired height and/or width.
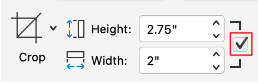
- Click on the image, then go to the “Picture Format” tab. Enter your desired height and/or width in the respective fields.
Moving Your Image
Moving an image within your Word document can be as simple as clicking and dragging it to the desired location. If you want more control over the horizontal and vertical position of the image, there are a few extra steps.
Windows Users: Click on the image, then go to the “Picture Format” tab. Open the “Position” tab. Set your requirements for horizontal and vertical alignment.
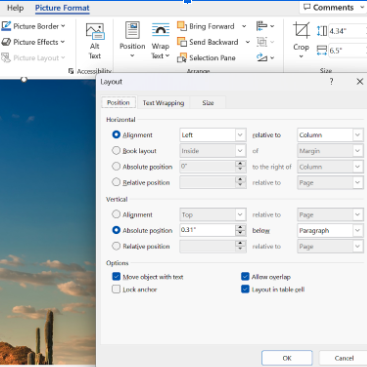
Mac Users: Click on the image, then go to the “Picture Format” tab. Click on the “Position” button. From the drop-down menu, select “More Layout Options” to open the “Advanced Layout” dialog box. Open the “Position” tab. Set your requirements for horizontal and vertical alignment.
Rotating Your Image
Lastly, let’s look at how to rotate your image.
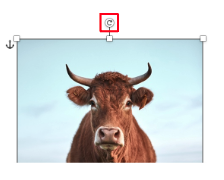
Windows Users: There are a couple of ways to rotate your image. The first option is to simply click on the image, then click and drag the circular arrow that appears above the top center of the image.
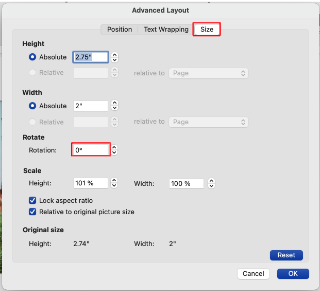
The second option is to click on the image and go to the “Picture Format” tab. In the “Size” group, click on the “Layout” button. Go to the “Size” tab. In the box next to “Rotation,” type the angle through which you want the image to rotate (use a negative number for a counterclockwise rotation and a positive number for a clockwise rotation).
Mac Users: There are a couple of ways to rotate your image. The first option is to simply click on the image, then click and drag the circular arrow that appears above the top center of the image.
The second option is to click on the image and go to the “Picture Format” tab. Click on the “Position” button, and open the “Size” tab. In the “Rotation” field, type the angle through which you want the image to rotate (use a negative number for a counterclockwise rotation and a positive number for a clockwise rotation).
Formatting in Microsoft Word
Would you like to learn more about the formatting tools available in Microsoft Word? Our CPD-certified course Formatting In Microsoft Word will guide you step-by-step through Microsoft Word’s functionalities and key tasks for formatting documents. Try some free lessons today!


Your email address will not be published.