

How to Annotate a PDF in Adobe Acrobat
As a freelance proofreader, you’ll likely be asked to proofread a PDF at some point. If you’re used to working in Microsoft Word, switching to a different format can feel daunting. Fortunately, with a bit of practice, proofreading a PDF becomes straightforward. In this post, we’ll show you how to annotate a PDF using Adobe Acrobat Reader, a free and widely used tool.
What Is a PDF?
PDF stands for “Portable Document Format.” It’s a file type developed by Adobe that preserves a document’s layout, fonts, images, and formatting across devices and operating systems.
PDFs are commonly used for sharing final versions of documents like reports, contracts, and books – especially when layout consistency is important. While they’re not designed for editing, Adobe Acrobat Reader provides robust tools for commenting and markup, making it possible to proofread them effectively.
How to Annotate a Structured PDF
Structured PDFs allow you to select text with your cursor, making them ideal for proofreading. Unlike in Word, though, you can’t edit the text directly or use the Track Changes and Compare tools. Instead, you’ll use the tools in the Comment toolbar to suggest changes.
Learning how to markup a PDF in this way is essential if you’re working with clients who need feedback on final layouts or print-ready materials.
We recommend using the following tools:
- Highlight
- Strikethrough
- Replace Text
- Insert Text
- Sticky Note
These allow you to annotate without altering the original content. Comments should be clear and concise – use them to explain your suggested edits or highlight anything that needs the client’s attention.
Setting Your Username
Before you start marking up, make sure your username is set correctly:
- Add your first comment using any tool (e.g., Sticky Note).
- Click the three dots in the comment box and select Properties.
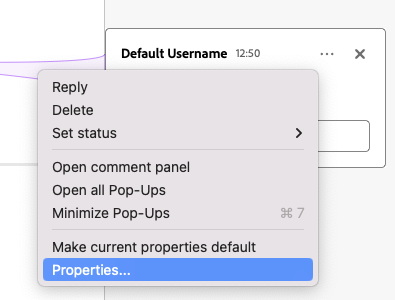
- Under the General tab, enter your name in the Author field.
- Select Make Properties Default and click OK.
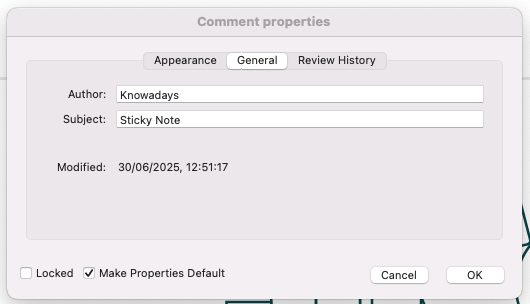
If your name reverts, go to Menu > Preferences (Windows) or Acrobat > Properties (Mac) and uncheck Always use Log-in name for Author name.
Using Adobe Acrobat Markup Tools
Here’s a breakdown of the core tools available in Adobe Acrobat Reader and how you can use each one to annotate text effectively during the proofreading process.
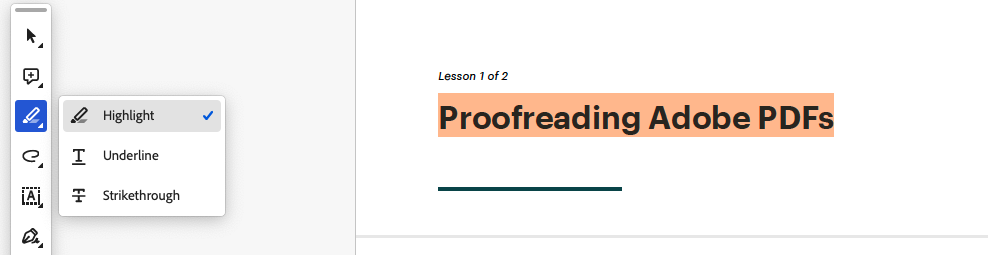
The Highlight Tool
The Highlight tool allows you to select and highlight text. This is particularly useful when you need to leave a note for your client suggesting an edit to a specific word, phrase, or sentence.
Here are the steps for highlighting text in a PDF:
- Select Highlight from the highlighting options on the markup toolbar.
- Use your cursor to select the text you want to highlight.
- Click on the highlighted text to open the options. You can add a comment, change the highlighting color, or delete the highlighting.
- To add a comment to explain the highlighting, click the comment symbol. A box will appear in the same way as for the Sticky Note, where you can write the comment and press Post to save it.
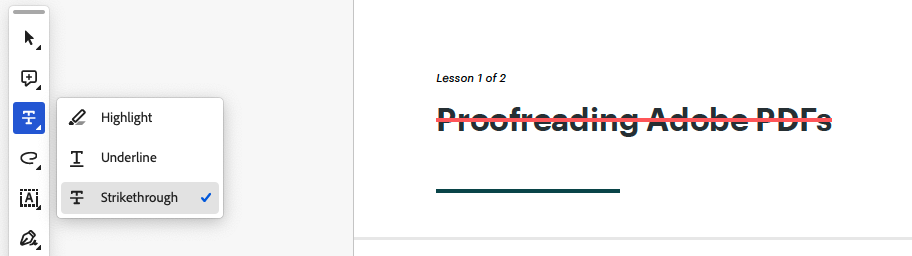
The Strikethrough Tool
The Strikethrough tool adds a horizontal line through selected text, making it perfect for marking up deletions.
Here’s how to strike through text in a PDF:
- Select Strikethrough from the highlighting options on the markup toolbar.
- Use your cursor to select the text you want to mark for deletion.
- If necessary, you can click on the crossed-out text to open the options. You can add a comment, change the line color, or delete the strikethrough.
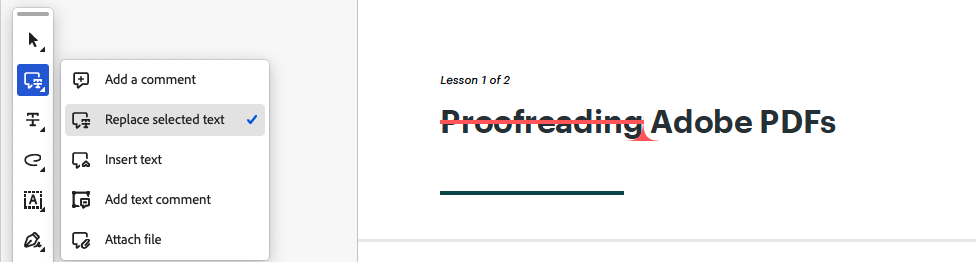
The Replace Text Tool
The Replace Text tool works similarly to the Strikethrough tool, except it adds a small arrow after the selected text. You can use this tool to indicate that your client should replace incorrect text, rather than simply delete it. You will thus need to provide the replacement text in your accompanying comment.
Here’s how to use the Replace Text tool:
- Select Replace selected text from the commenting options on the markup toolbar.
- Use the cursor to select the text you want to mark for replacement.
- Click on the crossed-out text to open the options and add a comment, typing into it the text that should be used instead, then click Post. As with the other tools, you can also change the line color or delete the strikethrough if you click on the markup.
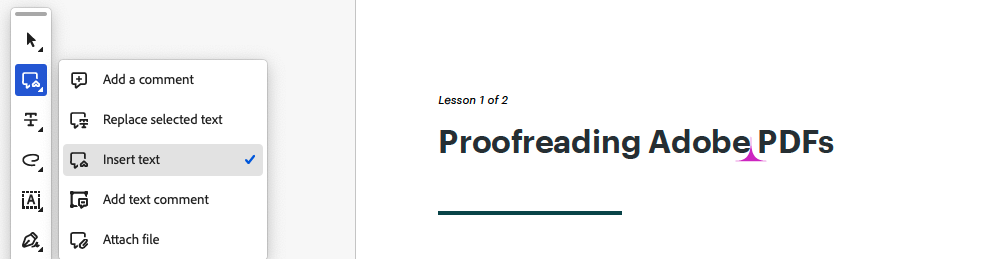
The Insert Text Tool
The Insert Text tool works much like the Replace Text tool but without striking through any text. Instead, it inserts a small arrow to indicate where something needs to be added. And, as with the Replace Text tool, you’ll need to specify what needs to be inserted in a comment.
Here’s how to use the Insert Text tool:
- Select Insert text from the commenting options on the markup toolbar.
- Place your cursor where you want to suggest an addition.
- Type your suggested text into the comment box that appears, then click Post. Again, you can click on the markup to give you the options to change the line color or delete the strikethrough.
The Sticky Note Tool
You can also use the Sticky Note tool to mark up anything relating to a whole page or a non-textual element that you can’t select.
To add a Sticky Note to a PDF:
- Select Add a comment from the commenting options on the markup toolbar.
- Click anywhere in the PDF to create a comment.
- Write your comment in the comment bubble that opens, and click Post when you’re done.
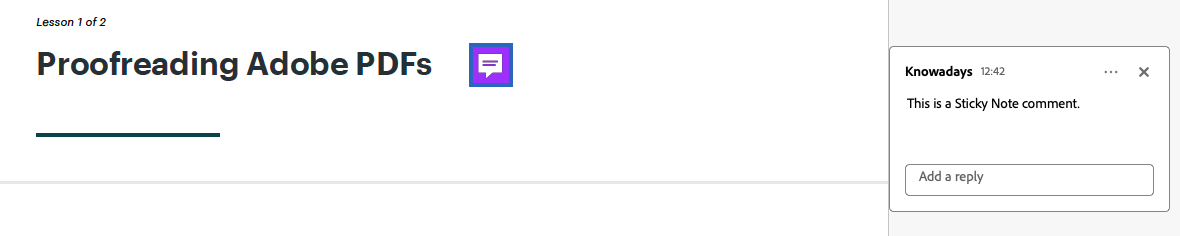
You can also press Ctrl + 6 (Windows) or Cmd + 6 (Mac) to add a Sticky Note at your cursor location. Then, simply add the comment text as usual.
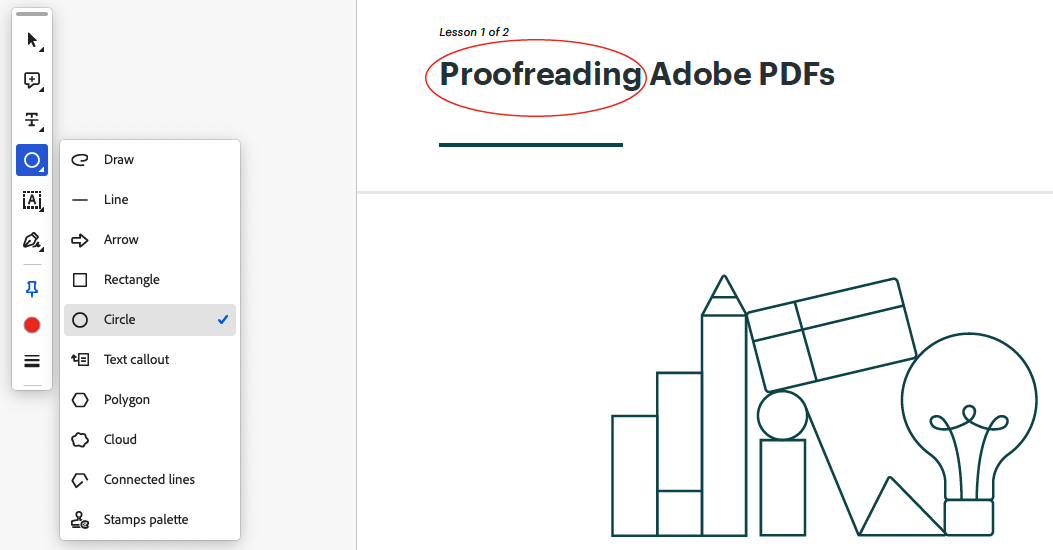
How to Annotate a Flat PDF
Flat PDFs are static images, so you can’t highlight or select the text. But you can still markup a PDF document effectively using The Sticky Note tool and the Drawing tools:
- The Sticky Note tool allows you to add notes wherever needed. Just be specific about what you’re referencing, as these notes can shift position if the file is imported into design software like InDesign.
- The Drawing tools, found in the commenting options on the markup toolbar, let you use shapes such as lines, boxes, or circles to visually highlight the part of the document your comment relates to:
Best Practices for PDF Proofreading
Effective proofreading isn’t just about adding comments, it’s about making sure your feedback is clear, actionable, and easy for the client to implement.
Once you’ve finished marking up, review your work thoroughly to ensure that you’ve stuck to the brief, the markup is accurate, and there are no introduced errors:
- Use the Comment sidebar to double-check each annotation.
- Click a markup to edit or delete it.
- Use comment status options (e.g., Completed, Rejected).
- Add replies to your comments to expand or clarify where needed.
Here are a few common mistakes to avoid when proofreading a PDF:
- Set a specific username. A generic Author tag looks unprofessional. Set your name before you begin.
- Don’t accidentally include punctuation or spaces in your markup.
- Avoid long, vague comments. Write concise, actionable feedback.
- Separate explanations from replacement text. Use a follow-up comment if needed.
- Avoid over-marking. If the same error appears repeatedly (e.g., extra spaces), flag the first instance and note “Applies throughout” to avoid clutter.
- Review every comment. Typos in your annotations can be just as problematic as in the original text.
When you’re happy with your annotations, you can return the document to your client.
What If a Client Wants You to Edit the PDF Directly?
Technically, you can edit a PDF directly using Adobe Acrobat Pro, but it’s usually not recommended. PDFs are typically typeset for print or visual presentation, and direct edits can disrupt layout. Unless your client explicitly asks for this – and you’re confident doing it – use markup tools instead.
Other Ways to Annotate a PDF
While Adobe Acrobat Reader is a go-to choice for many proofreaders, it’s not the only tool available. You might prefer a different setup depending on your workflow or the client’s needs. For instance, some editors use PDF stamps to replicate traditional proofreading marks, especially when working with clients who expect that visual style. Others opt for other free PDF editors as an alternative when Acrobat isn’t accessible.
If your client uses InDesign, your annotations may even be imported directly into their layout software. To ensure a smooth process, keep replacement and insertion comments clean and concise, and don’t mix them with explanations. If you need to clarify anything, add a short reply in a separate comment.
Becoming A Proofreader
If you want to know more about the tools we’ve discussed, our Becoming A Proofreader course covers everything you need to know to annotate a PDF, plus many other document types. You can even try it out for free!


Your email address will not be published.