How to Use the Compare Tool in Google Docs for Proofreading
Google Docs includes a tool that lets you compare two documents. And this can be useful for proofreaders, especially if you forget to use the Suggest Edits function when working on a document. In this blog post, then, we’ll first set out how to use the compare tool in Google Docs, then we’ll look at how you can use it for proofreading.
How to Use the Compare Tool in Google Docs
To compare two documents in Google Docs, you will need an unedited and edited version of the document you want to compare (i.e., the original version your client sent you and the proofread version you have worked on). These are the documents you will compare.
Once you have these, you can run a comparison as follows:
- Open the original, unedited version of the document in Google Docs.
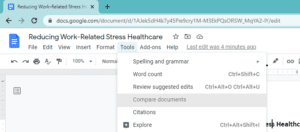
- Go to Tools > Compare documents via the menu at the top of the screen.

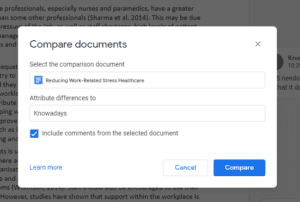
- Click My Drive and find the edited version of the document.
- Check the name used for attribution and amend as required.
- Select Include comments from the selected document.
- Click Compare to confirm and then Open to see the comparison.

The differences between the original and edited versions – as well as comments from the edited version – will then be displayed in a new copy of the document as suggested edits (i.e., using the same highlighting and comments produced by the Suggest Edits tool).

You can then use this new document to review your edits. When you’re happy with any final revisions, rename the document as required and let your client know it is ready.
What If You Only Have One Version of a Document?
Because Google Docs is a cloud-based word processor, you and your client may only have one version of a document between you. This makes it different from Microsoft Word, where you and your client will typically have separate files saved on your own computers.
This won’t be an issue as long as you use the “Suggesting” mode to make changes. But if you forget to switch this on, or you prefer to work on a document without visible markup, the lack of an “original” and “edited” version will make it impossible to use the “Compare” tool.
The simplest solution to this is to create a backup version of the document before you start working. You can do this by going to File > Make A Copy and selecting a name and folder for the copy of the document. This can then serve as a point of reference while you work.
However, if you don’t have a backup, all is not lost! The “Version History” tool means you can recover the original version of the document and use this to run a comparison. To do this:
- In the edited document (Copy 1), go to File > Make A Copy and save a copy with all of the edits made and comments left during the proofreading process. This new copy (Copy 2) will be the edited version when you run the comparison.
- In Copy 1, go to File > Version History > See Version History.
- Scroll down until you find the version of the document your client shared with you.
- Click the three dots next to this version and select Restore This Version.
![]()
This will restore Copy 1 to its state before proofreading. You can now run a comparison using Copy 1 as the original and Copy 2 as the edited version. This should then produce a third version with all the differences displayed as suggested edits. When you are happy with this final version, rename it as required and share it with your client.
Becoming A Proofreader
For more information on using Google Docs as a proofreader, the Becoming A Proofreader course has you covered. Sign up for a free trial today to see how the course works.


Your email address will not be published.